
How to Connect OpenClaw to Your Research Database
Want to save hours on research tasks? OpenClaw, an open-source AI framework, can connect directly to your research database and automate time-consuming workflows like literature reviews, citation formatting, and data extraction. By integrating OpenClaw, researchers can reduce manual library tasks by 30–60% and double their workload capacity without extra staff.
Key Steps to Get Started:
- System Requirements: Ensure your system meets the minimum specs (e.g., macOS 11+, Windows 10+, Linux distributions like Ubuntu 20.04+).
- Credentials: Prepare database credentials, API keys, and a secure gateway token.
- Installation: Use tools like
npmor a curl script to install OpenClaw. - Configuration: Set up the
openclaw.jsonfile for database integration and secure connections. - Data Sync: Enable real-time updates with webhooks or schedule periodic syncs.
This guide provides a step-by-step walkthrough to help you set up OpenClaw, secure your connections, and streamline your research workflow.
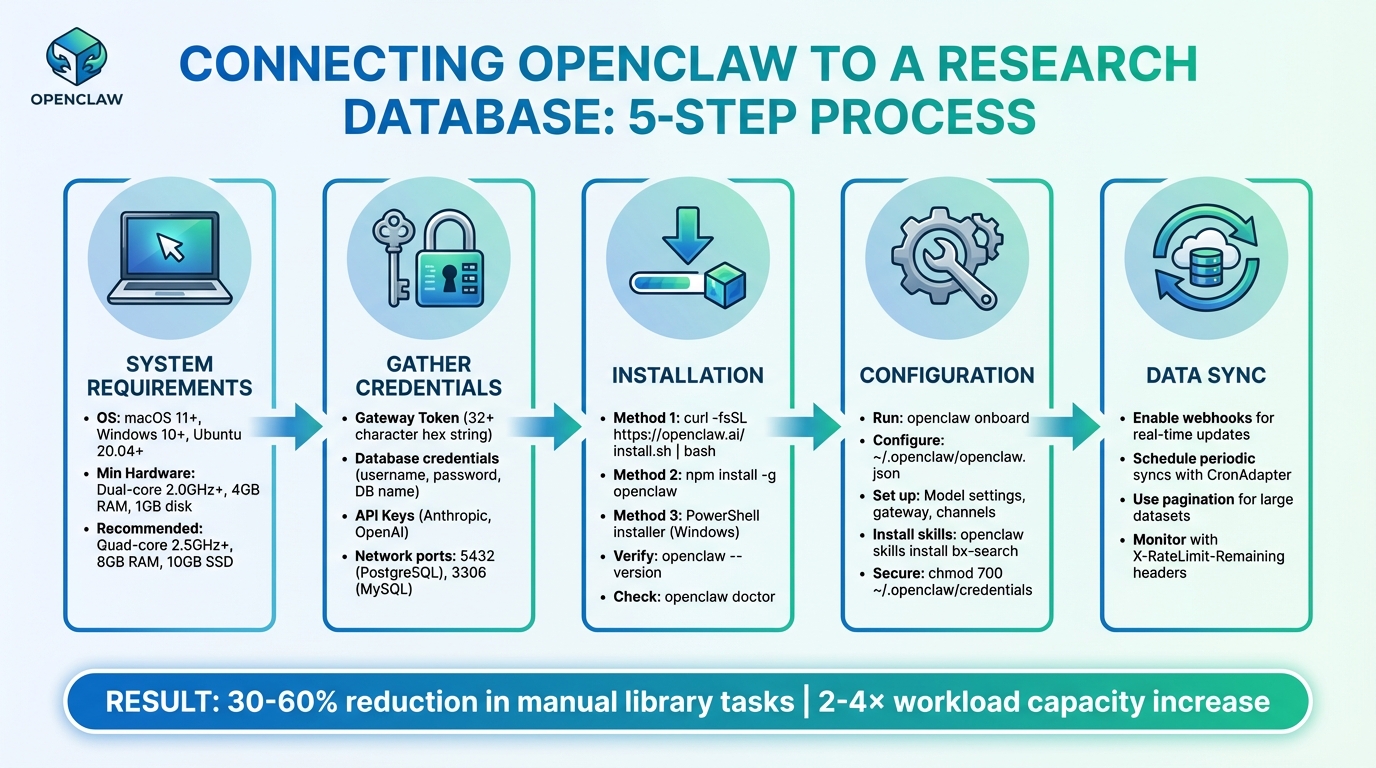
5-Step Process to Connect OpenClaw to Your Research Database
Prerequisites for Connecting OpenClaw to Your Research Database
To ensure a smooth integration process, it's important to prepare your system and gather the necessary credentials. Laying this groundwork helps avoid common issues that could disrupt your workflow automation.
System Requirements and Compatibility
To run OpenClaw, your system needs to meet the following requirements:
- Operating System: macOS 11 (Big Sur) or newer, Windows 10 (1903+) or 11 (64-bit), or Linux distributions like Ubuntu 20.04+, Debian 11+, or Fedora 35+.
- Minimum Hardware: Dual-core 2.0GHz+ CPU, 4GB RAM, and 1GB of disk space for basic cloud-based AI tasks.
- Recommended Hardware for Research Workflows: Quad-core 2.5GHz+ CPU, 8GB RAM, and 10GB SSD space.
- For Running Local AI Models (via Ollama): 8-core processor (3.0GHz+), 16–32GB RAM, and at least 50GB NVMe SSD.
OpenClaw integrates seamlessly with SQL-based databases like PostgreSQL, MySQL, and MariaDB, as well as academic repositories such as PubMed, arXiv, Semantic Scholar, DOAJ, Google Scholar, Scopus, Web of Science, and JSTOR. While open repositories can often be accessed using APIs or browser tools, institutional databases typically require login credentials.
Access Credentials and Permissions
Setting up OpenClaw requires several types of credentials:
- Gateway Token: Define a unique token (UUID or a random 32+ character hex string) in the
openclaw.jsonfile undergateway.auth.tokento authenticate connections to your OpenClaw instance. - Database Credentials: Create a dedicated database user with a username, password, and database name (e.g.,
openclaw_db) in theopenclaw_config.yamlfile. Ensure the user has full privileges to connect, read, write, and create tables. For PostgreSQL, use theGRANT ALL PRIVILEGES ON DATABASEcommand. - API Keys: Store keys for providers like Anthropic or OpenAI as environment variables (e.g.,
<PROVIDER>_API_KEY). Semantic Scholar requires an API key for influence metrics, while repositories like Scopus and JSTOR need institutional login details for browser-based access. - Network Configuration: Ensure firewalls allow traffic on database ports, such as port 5432 for PostgreSQL and port 3306 for MySQL. For PostgreSQL, update the
pg_hba.conffile to permit connections from your OpenClaw host IP.
To keep sensitive information secure, store keys in ~/.openclaw/.env or as system environment variables rather than embedding them in configuration files. Use the telnet [db_host] 5432 command to confirm that your OpenClaw instance can connect to the database through any firewalls.
Installing OpenClaw Software
You can install OpenClaw globally using one of the following methods:
- Curl Script: Run
curl -fsSL https://openclaw.ai/install.sh | bash. - npm: Use
npm install -g openclaw. - Windows PowerShell: Windows users can rely on the PowerShell installer.
After installation, verify everything is set up correctly by running openclaw --version and openclaw doctor to check for any missing dependencies or configuration issues.
Next, launch the onboarding wizard with openclaw onboard. This interactive setup guides you through essential configurations, including security settings, model selection (OpenAI, Anthropic, Gemini), and chat platform connections like Telegram or Discord. The main configuration file is located at ~/.openclaw/openclaw.json, with sections for agent (model settings), gateway (network configurations), and channels (access policies).
To enable database-specific capabilities, install relevant skills. For example:
- Use
moltbot install databaseoropenclaw skills install bx-searchto add specialized tools for data processing and search. - For continuous database syncing, run
openclaw onboard --install-daemon.
Finally, secure your credentials by restricting file access to your user account using chmod 700 ~/.openclaw/credentials.
Once these steps are complete, you can move on to configuring OpenClaw for a secure and efficient connection to your research database.
sbb-itb-f7d34da
Step-by-Step Guide to Connecting OpenClaw to Your Research Database
With your system set up and credentials ready, it's time to connect OpenClaw to your research database. This involves three main steps: configuring your settings, securing the connection, and enabling data synchronization.
Configuring OpenClaw Settings
You can configure OpenClaw using the ~/.openclaw/openclaw.json file or the onboard wizard. This configuration file manages both the model (agent) and network (gateway) settings.
To integrate OpenClaw with your research database, you’ll use the Model Context Protocol (MCP) alongside the http-fetch tool. This tool allows OpenClaw to perform REST API operations - GET, POST, PUT, and DELETE - directly with your database. By default, the local REST API runs on port 18789 and can handle over 100 requests per second on modern hardware.
For more advanced workflows, tools like AutoResearchClaw can be integrated. According to the integration guide:
"The simplest way to use AutoResearchClaw: give the repo URL to OpenClaw and say 'Research [your topic].' That's it - OpenClaw handles cloning, installing, configuring, and running the entire 23-stage pipeline for you".
Make sure to reference API keys in the configuration file using ${env.DB_API_KEY}. Most changes take effect automatically through hot reloading, so a gateway restart is only needed for core infrastructure updates like port or bind address changes.
Once your settings are configured, the next step is to secure your connection.
Establishing a Secure Connection
To keep your connection safe, you'll need to authenticate it using a secure gateway token. The OpenClaw Gateway Token Setup Guide emphasizes:
"Never use simple passwords like 'password123' or 'admin' as your gateway token. Anyone who knows your token has full access to your AI agent".
Ensure the token is correctly set in your openclaw.json file. A common mistake is using a plain string for the auth field instead of an object. The correct format is:
"gateway": {
  "auth": {
    "token": "your-token-here"
  }
}
If your research database is on a separate network, you can enable remote connections by setting "controlUi": { "allowInsecureAuth": true } in the gateway settings. However, always pair this with HTTPS to encrypt data during transmission.
To confirm everything is set up correctly, run openclaw doctor or openclaw models status --probe to test authentication with external services. For production environments, consider adding extra security measures like IP allowlists or domain whitelists to limit access. Also, configure reasonable request timeouts (typically 30 seconds) and use exponential backoff for retries to handle network issues.
With the connection secured, you can now move on to syncing data.
Syncing Data Between OpenClaw and Your Database
OpenClaw offers several methods for synchronizing data, including local REST API triggers, inbound webhooks for real-time updates, and outbound API calls using custom skills. You can also use CronAdapter to schedule periodic data updates.
For real-time updates, register inbound webhooks at /api/webhooks to receive instant database changes. When dealing with large datasets, use pagination (e.g., ?page=1&per_page=50) to manage data efficiently. Keep an eye on response headers like X-RateLimit-Remaining to avoid 429 errors when your quota gets low.
The MemoryAdapters feature ensures knowledge is retained across sessions, which is particularly useful for ongoing research tasks. Gate Stages allow you to manually approve data before syncing, ensuring high-quality research data throughout your workflow. Additionally, using MetaClaw for cross-run learning can reduce retry rates by 24.8% and improve overall robustness by 18.3%.
| Sync Method | Direction | Best Use Case |
|---|---|---|
| Inbound Webhooks | External → OpenClaw | Real-time updates from research databases |
| HTTP Fetch (MCP) | OpenClaw → External | Querying real-time data or interacting with third-party services |
| Local REST API | Internal → OpenClaw | Triggering automations from local scripts |
| CronAdapter | Scheduled | Periodic synchronization and daily research re-runs |
Troubleshooting Common Issues
After setting up and securing your connection, you might still encounter some hiccups. Here’s how to address common problems effectively.
Connection Errors and Authentication Problems
Even with a careful setup, connection errors can happen. Authentication issues usually stem from three areas: your local configuration file (openclaw.json), the OpenClaw gateway (often due to token mismatches), or your upstream provider (like expired API keys).
Token mismatches occur when the client token doesn’t align with what the gateway expects. To resolve this, use the command openclaw gateway status to verify the current state. Check that the gateway.auth.token in your configuration matches the token used to start the gateway.
Keep in mind, OpenClaw prioritizes environment variables over configuration files. If a variable like OPENCLAW_OPENAI_API_KEY is set incorrectly, it will override your config file. Use openclaw config show --unmask-partial to verify credentials and test connectivity with curl -v.
Here’s a quick reference table for common error codes and their fixes:
| Error Code | Meaning | Common Cause | Recommended Action |
|---|---|---|---|
| 401 | Unauthorized | Invalid/expired API key or token mismatch | Regenerate key; verify gateway auth token |
| 403 | Forbidden | IP blocked or lack of model access | Check regional restrictions; verify account tier |
| 429 | Too Many Requests | Rate limit exceeded | Use minInterval in config; check billing |
| 502/503 | Service Unavailable | Provider outage or local proxy failure | Check provider status page; verify Nginx/Caddy |
For subscription services like Claude, 401 errors often mean expired tokens. In this case, run /logout and then /login to renew the session. On macOS, corrupted Keychain entries may block authentication, while on Linux, improper file permissions (e.g., ~/.openclaw/ should be 600 or 700) can cause issues. Running openclaw doctor --fix can address these problems automatically.
If authentication seems fine but problems persist, take a closer look at data synchronization settings.
Data Synchronization Failures
Synchronization issues often arise from resource limits or misconfigurations. Systems with less than 4GB of RAM may experience crashes that interrupt the process. Additionally, a bug in Node 24 with experimental SQLite may cause errors like "database is not open", even after a successful search.
Scheduled tasks, like cron jobs, are essential for keeping data in sync. If these tasks aren’t running or lack proper permissions, synchronization will fail. Check logs for errors such as "Connection refused", "Timeout", or "SSL/TLS handshake failure." Look in /var/log/openclaw/error.log or use docker logs [container_name] for Docker setups. Accurate server time is also critical - use tools like ntpdate or chrony to ensure time synchronization, as mismatched clocks can disrupt SSL/TLS handshakes.
For large databases, increase the request timeout in your configuration to 300,000ms (5 minutes) to prevent interruptions during heavy data transfers. Use curl -v to test connectivity directly to your database or API endpoint and rule out network-level blocks. If data remains inconsistent, clear OpenClaw’s internal cache and any web server caches, such as the Nginx FastCGI cache.
Performance Optimization Tips
Once sync issues are resolved, consider these tweaks to improve performance.
Efficient database indexing speeds up data retrieval by avoiding full table scans during queries. For PostgreSQL, set shared_buffers to about 25% of your system’s total RAM to enhance caching. Running VACUUM ANALYZE regularly helps reclaim space and updates statistics for better query planning.
Using a connection pooler like PgBouncer reduces overhead from frequent database connections. Adjusting work_mem for queries involving complex sorting or aggregations minimizes reliance on temporary disk writes. Set connection timeouts (30 seconds) and request timeouts (120 to 300 seconds) in your openclaw.json5 file to handle long-running processes effectively.
Monitor your system with tools like htop for CPU and memory usage, iostat for disk I/O, and iftop for network traffic to identify bottlenecks. Upgrading to NVMe SSDs can drastically improve database performance by speeding up random read/write operations. Also, increase file descriptor limits using ulimit -n to handle high traffic without errors.
Benefits of Using OpenClaw with Your Research Database
Integrating OpenClaw into your research database can transform how you handle data and collaborate with your team. Here's how it enhances workflows and team coordination.
Streamlining Academic Workflows
OpenClaw takes over repetitive, time-consuming tasks, freeing up researchers to focus on deeper analysis. For instance, it automates literature discovery across platforms like PubMed, arXiv, and Semantic Scholar. This means the agent can work independently, without needing constant oversight. A great example: in March 2026, AgentPatch analyzed 34 arXiv papers on federated learning in just 5 minutes - something that would usually take half a day.
It also simplifies systematic reviews by extracting study parameters directly into spreadsheets and can schedule analyses to run overnight. This approach turns tasks that would normally take over 30 hours into something ready by morning. Plus, OpenClaw integrates seamlessly with tools like Zotero and Obsidian, automatically adding relevant papers to your collections and generating Markdown summaries. Thanks to these features, academic institutions in 2025 reported workloads increasing 2–4× without needing additional staff.
Improved Collaboration and Organization
OpenClaw doesn't just save time - it also fosters better team collaboration. Its shared infrastructure ensures that teams can retain insights and stay organized over time. With integrations to messaging platforms like Slack, Discord, Telegram, WhatsApp, and iMessage, team members can receive updates and interact with the agent in shared channels. The workflow includes human-in-the-loop "Gate Stages" for critical oversight during key steps like literature screening (Stage 5), experiment design (Stage 9), and paper quality review (Stage 20).
MetaClaw's cross-run learning feature enhances reliability by reducing retry rates by 24.8% and improving robustness by 18.3%. In March 2026, Aiming Lab's A/B experiments showed how this feature turns lessons from previous cycles into reusable skills stored in a shared directory. Teams can also maintain centralized repositories using tools like Zotero, Obsidian, and Notion. Additionally, Stage 21 of the pipeline creates reproducibility bundles, archiving all experiment-related code, data, and decisions for future use.
Conclusion
This guide has walked you through the process of connecting OpenClaw to your research database, helping you cut down on repetitive tasks like literature searches, downloading PDFs, and formatting citations.
The results speak for themselves. Academic institutions using OpenClaw have reported a 2–4× increase in workload capacity and a 30–60% reduction in time spent on manual library workflows. Whether you choose to run OpenClaw locally for added privacy or opt for a hosted version for continuous operation, you’re setting up a system that works tirelessly in the background.
You can start small - schedule a weekly digest or automate a single systematic review - and immediately see the time savings. Once you experience these benefits, scaling to more complex workflows becomes a natural next step. And since the framework is open-source, it's easy to deploy locally without any upfront barriers.
FAQs
Which database types work best with OpenClaw?
OpenClaw performs optimally when paired with self-hosted, SQL-based databases such as PostgreSQL. These types of databases provide the stable connectivity needed for dependable data management and synchronization. To get the best results, ensure your database supports consistent and secure connections for seamless compatibility.
How do I keep my API keys and gateway token secure?
Protecting your API keys and gateway token in OpenClaw requires some careful steps to keep your sensitive data safe. Here’s how you can do it:
- Use environment variables or secret management tools: Store your credentials in environment variables, secret management systems, or encrypted files. This keeps them out of your codebase and reduces the risk of accidental exposure.
- Avoid hardcoding or sharing credentials: Never hardcode your keys or tokens directly into your code. Also, refrain from sharing them in public repositories or unsecured channels.
-
Set strict permissions: Limit access to your OpenClaw interface and files. For instance, use restricted permissions like
chmod 700on directories to ensure only authorized users can access them. - Generate secure tokens: Always create random, secure gateway tokens. Avoid exposing them in logs or any public-facing files.
By following these steps, you can significantly reduce the risk of unauthorized access to your API keys and gateway token.
Should I use webhooks or scheduled sync for updates?
Webhooks are perfect for getting updates in real-time or close to it. They’re designed to deliver data quickly, making them ideal for workflows that rely on immediate reactions to events. On the other hand, if timing isn’t as critical, scheduled syncs - like cron jobs - are a solid choice. These allow you to sync data at regular intervals, offering a more structured way to handle updates in batches. While webhooks reduce delays, scheduled syncs give you the flexibility to manage updates on your own schedule.
