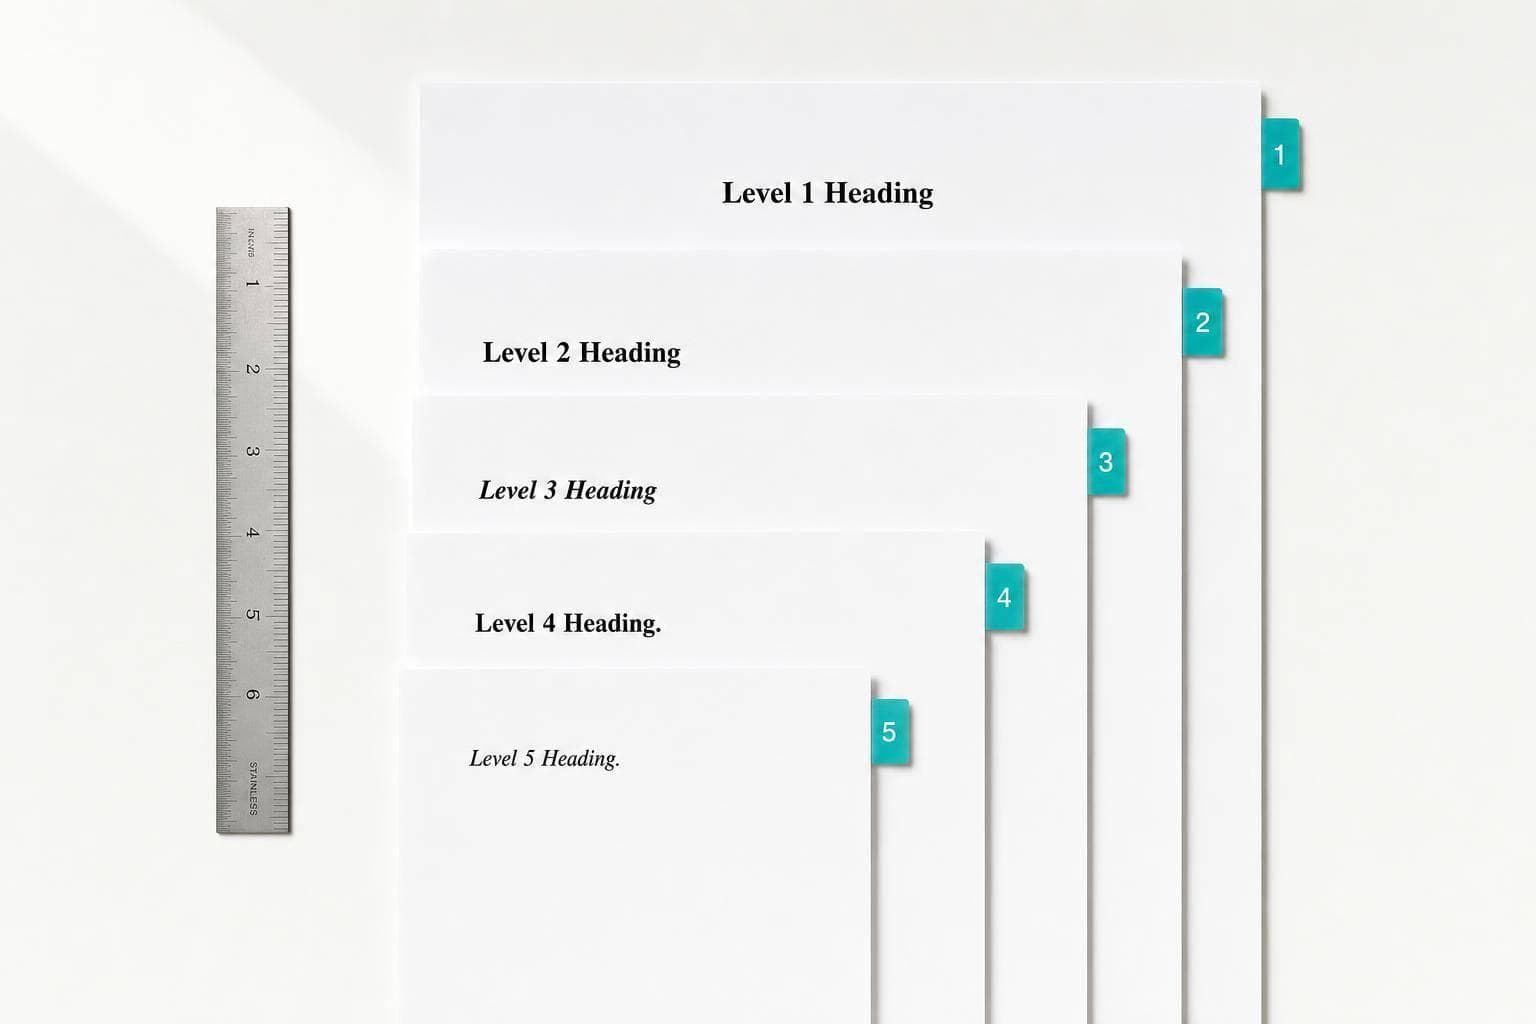
APA Headings: Levels 1–5 Formatting Guide With Visual Examples
If you learn just 3 things, make them these: APA has 5 heading levels, Levels 1–3 start text on a new line, and Levels 4–5 run into the paragraph with a period.
I’d sum up the whole guide like this: you use APA headings to show your paper’s structure from main sections down to small subsections. Each level has a set format for alignment, bold or italics, indentation, and whether the text starts on a new line or the same line. Most student papers use 1–3 levels, while longer papers may use all 5.
Here’s the short version you can use right away:
- Level 1: centered, bold, new line
- Level 2: flush left, bold, new line
- Level 3: flush left, bold italic, new line
- Level 4: indented 0.5 inch, bold, period, same line
- Level 5: indented 0.5 inch, bold italic, period, same line
Quick facts:
- All 5 levels use Title Case
- 0.5-inch paragraph indent is standard in APA
- 2 rules trip people up most: don’t skip levels and don’t use just one subsection by itself
- APA says not to label the opening section as “Introduction”
| Level | Alignment | Style | Period | Text Starts |
|---|---|---|---|---|
| 1 | Centered | Bold | No | New line |
| 2 | Flush left | Bold | No | New line |
| 3 | Flush left | Bold Italic | No | New line |
| 4 | Flush left, 0.5 in. indent | Bold | Yes | Same line |
| 5 | Flush left, 0.5 in. indent | Bold Italic | Yes | Same line |
What I like about this system is that it’s simple once you see the pattern: broad sections at the top, narrower sections underneath. If you match your outline to the right heading level and keep the format consistent, your paper will look correct and read more smoothly.
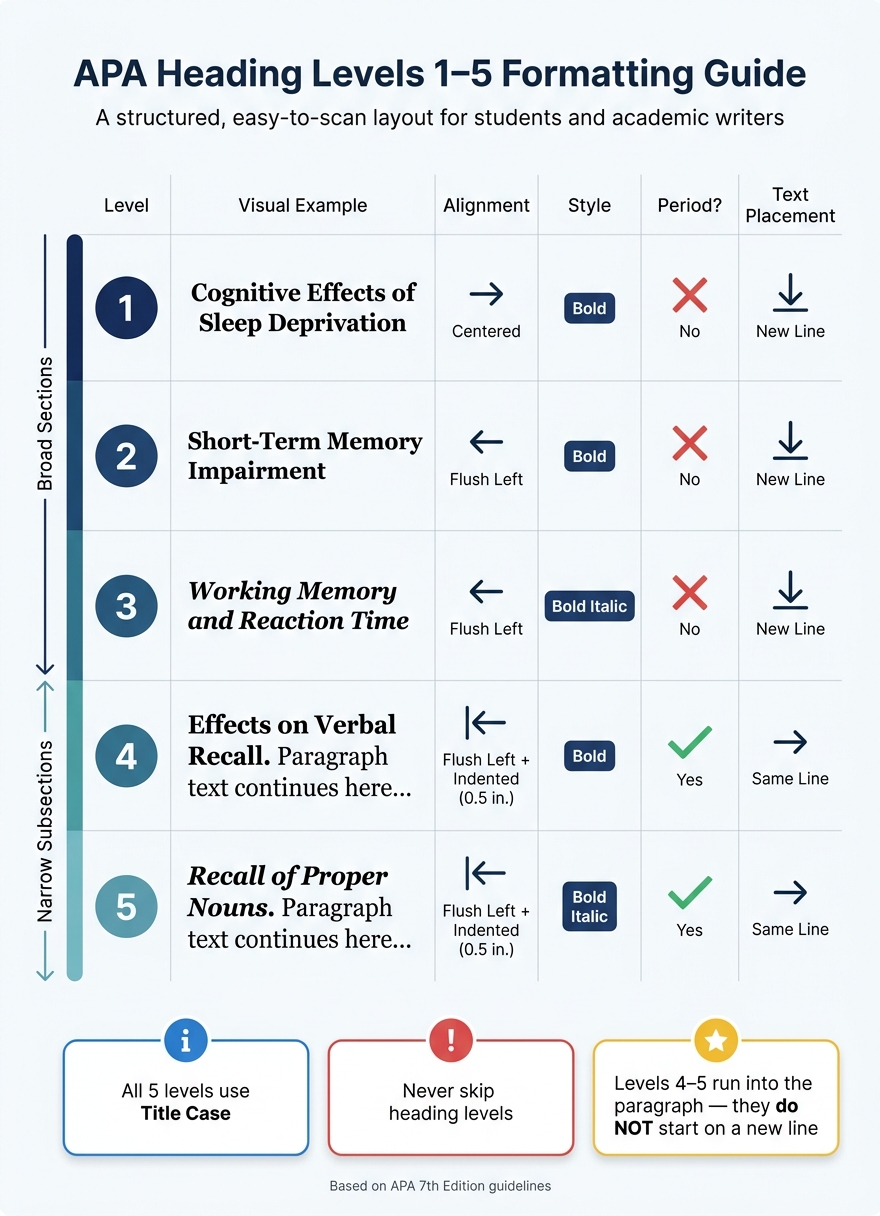
APA Heading Levels 1–5: Complete Formatting Cheat Sheet
APA (7th ed.) Headings
APA Heading Levels at a Glance
Before you start formatting, it helps to see the whole system in one place. APA uses five heading levels. Level 1 marks the main section, and Level 5 is the most specific subsection. As you move down the hierarchy, each level gets narrower than the one above it.
You can use these heading levels to organize essays, research papers, and reports from broad sections down to detailed subsections. The table below gives you a quick reference before the next section walks through the formatting rules.
How the Heading Hierarchy Moves From Broad Sections to Narrow Subsections
Level 1 headings mark main sections such as Methods or Results. Level 2 sits under Level 1, Level 3 under Level 2, and that pattern continues through Level 5.
Three rules keep the structure consistent:
- Do not skip levels.
- Keep sections at the same level parallel throughout the paper.
- Use at least two subheadings at any level you introduce.
Quick Comparison Table for All Five APA Heading Levels
| Level | Alignment | Styling | Title Case | Indentation | Period at End | Text Placement |
|---|---|---|---|---|---|---|
| 1 | Centered | Bold | Yes | None | No | Text begins on new line |
| 2 | Flush Left | Bold | Yes | None | No | Text begins on new line |
| 3 | Flush Left | Bold Italic | Yes | None | No | Text begins on new line |
| 4 | Flush Left | Bold | Yes | 0.5 in. | Yes | Text follows on the same line |
| 5 | Flush Left | Bold Italic | Yes | 0.5 in. | Yes | Text follows on the same line |
The biggest shift happens between Levels 3 and 4. Levels 1–3 stand on their own lines. Levels 4–5 run into the paragraph. If you just need the fast version, the table lays it out clearly. The next section gets into the exact formatting for each level.
How to Format APA Heading Levels 1–5
Use the table above as a quick reference. Here’s what each APA heading level looks like in actual use.
Levels 1, 2, and 3: Centered or Flush-Left Headings on Their Own Line
The first three heading levels each sit on their own line. What changes is the alignment and styling.
Level 1 - Centered, bold, Title Case. No period at the end.
Cognitive Effects of Sleep Deprivation
Level 2 - Flush left, bold, Title Case. No period at the end.
Short-Term Memory Impairment
Level 3 - Flush left, bold italic, Title Case. No period at the end.
Working Memory and Reaction Time
For all three, start the paragraph on the next line and indent it 0.5 inches. Level 2 and Level 3 are both flush left, so the main difference comes down to styling: Level 2 uses bold, while Level 3 uses bold italic.
Levels 4 and 5 work differently. Instead of sitting on their own line, they run straight into the paragraph.
Levels 4 and 5: Indented Run-In Headings With Periods
Levels 4 and 5 are run-in headings. That means the heading starts the paragraph, and the text continues on the same line. Both are indented 0.5 inches from the left margin and end with a period.
Level 4 - Indented, bold, Title Case, ends with a period. Text continues on the same line.
Effects on Verbal Recall. This paragraph continues on the same line.
Level 5 - Indented, bold italic, Title Case, ends with a period. Text continues on the same line.
Recall of Proper Nouns. This paragraph continues on the same line.
Formatting Rules That Apply to All Heading Levels
Across all five levels, three rules stay the same.
Use the same font and size as the body text, and double-space every heading. Don’t add extra blank lines above or below a heading.
Title Case means you capitalize the first word and all major words. So "Effects on the Brain" is correct, while "Effects on the brain" is not.
Never number your headings. Also, don’t use the word "Introduction" as a heading. In APA style, the opening paragraphs already serve that role, so no label is needed.
sbb-itb-f7d34da
How to Choose the Right Heading Level for Your Paper
Now that you’ve seen what each APA heading looks like, the next step is simple: use your outline to match each part of your paper to the right level. Big sections usually take Level 1. Any section nested under that moves down to the next level.
A Step-by-Step Method for Assigning Heading Levels
Start with your main sections. In a research paper, parts like Methods, Results, and Discussion are often Level 1 headings. If one of those sections needs smaller parts, use Level 2 headings for those subsections. Under Methods, for instance, you might have Participants and Procedure.
One rule trips people up all the time: if you introduce subsections at any level, use at least two of them. If there’s only one subsection, don’t turn it into a heading. Just keep it as normal paragraph text instead.
After you assign each heading level, give the draft a careful check. A few small formatting slips can throw the whole setup off.
Common Heading Mistakes That Cause APA Formatting Errors
Don’t skip levels. APA headings should move in order from broad sections to narrower ones.
Use Title Case, not sentence case. That means you capitalize the major words in all five heading levels.
Make sure each level matches the right APA format. For example, Level 2 is flush left and bold, not centered.
For Levels 4 and 5, the heading runs into the paragraph instead of sitting on its own line. It ends with a period, and the paragraph text starts right after it on the same line.
Using Sourcely to Organize APA-Style Research Sections
Once your heading levels are in place, the next move is simple: fill each section with evidence that fits.
Finding Sources for Each Section of an APA Paper
Use your APA headings like a map. Each one points to the kind of source that section needs.
A section-by-section search can make this much easier. Paste in your draft to see which parts need more support, and Sourcely flags weak sections so you can look for peer-reviewed articles and free PDFs that fit each headed section. That way, every heading stays connected to the evidence it’s supposed to carry.
Managing References and Summaries While Building a Structured Draft
Source summaries can help you sort each paper under the right heading level. For instance, you might use them to decide whether a source belongs under a Level 3 subsection on Participant Recruitment. If you’re building your references as you go, the reference export feature can also save time on your APA reference list.
After you group sources by section, check your outline one more time. A heading structure can look right at first glance, but once the sources are in place, you may notice that a subsection needs to move up, split apart, or fold into another section.
Conclusion: The Five Heading Patterns to Remember
APA headings give your paper structure. Matching sources give each section support.
Every level uses Title Case, and the hierarchy moves from broad Level 1 sections to narrower subsections below them. Clear headings, paired with the right sources, help keep each section focused and easy to follow.
FAQs
How many heading levels do I need?
It depends on how long and detailed your paper is. APA Style includes five heading levels, but most student papers only need one to three. The goal is simple: use only the heading levels that help break your paper into clear sections.
Try not to pile on headings just for the sake of structure. Too many can make a paper feel chopped up. And if you add subheadings, follow a simple rule: include at least two under a parent section - or skip them altogether.
When should I use a run-in heading?
Use a run-in heading for Level 4 or Level 5 headings. Unlike Levels 1–3, which sit on their own line above a new paragraph, a run-in heading is indented, followed by a period, and the text starts on the same line.
It’s a simple way to organize smaller subsections without breaking the flow of the paragraph.
Can I use just one subsection?
Got it.
If a section uses subsections, include at least two. If there’s only one, don’t use a subsection at all - just keep the top-level heading on its own.